
How to Rig Baits and Hard Lures
When it comes to trolling, fishermen can rig lures or bait in many different ways and find success. Sinking lures are normally rigged with wire leaders, diving lures are normally rigged with heavy mono leaders, whole dead baits are rigged with skirts, and strip baits are rigged with double hooks. The variations on each of the rigs are nearly endless.
This article will share the tools, materials, and instructions for each type of trolling rig.
Table of Contents
Use this section of the post to jump to your area of interest.
Rigging a Whole Bait
Whole dead bait is commonly used for trolling. Live baits are usually used when drifting to let the fish to move more naturally on the line. When going at moderate trolling speeds, a whole dead looks bait natural and gives off a scent to attract fish to bite. Some anglers will dress up the bait with a skirt at the front to protect the bait from deteriorating too quickly and to help attract fish with a bright color.
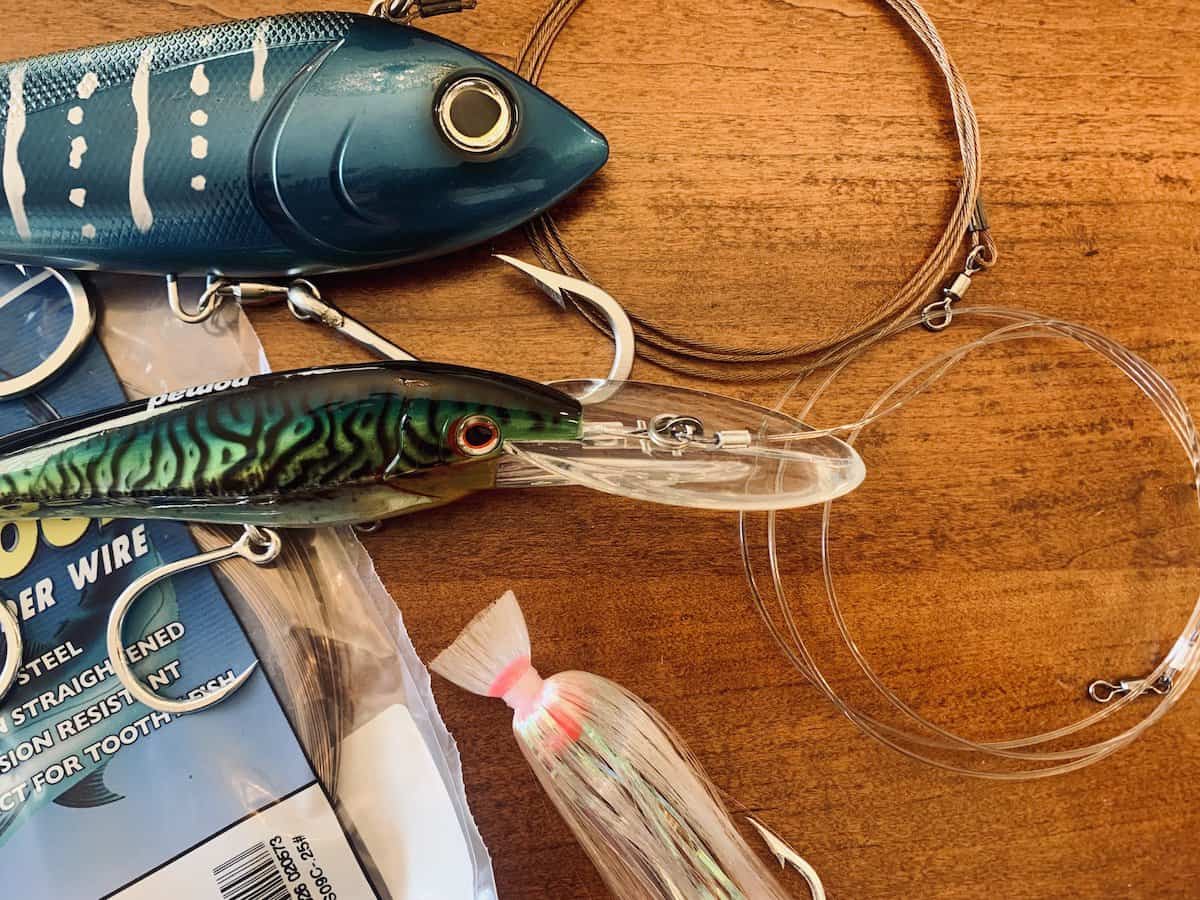
Rigging whole bait can be challenging. It normally involves prepping the bait, working with wire and threading a hook through the bait’s body. A ballyhoo is one of the most common whole baits to rig for trolling.
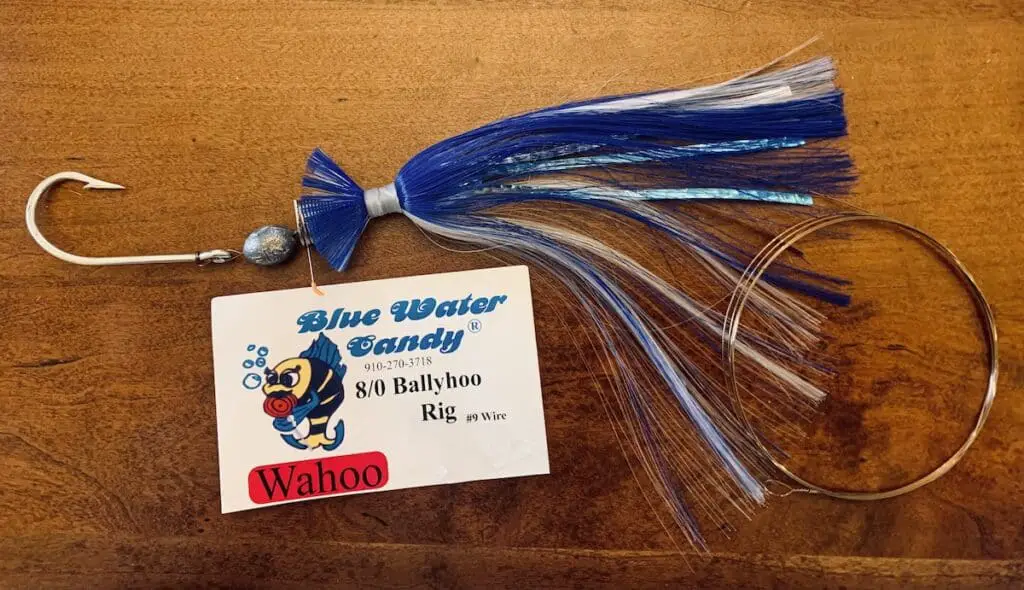
You can create you own rig or buy pre-made rigs with or without the ballyhoo. If you’re someone who fishes frequently, you may want to do a cost comparison to figure out if you should invest in the tools and supplies to build your own, or keep buying pre-made rigs. See the tables below for a cost comparison of a pre-made rig and purchasing the materials in the rig yourself.
| Item | Product | Unit Price |
| 1 Pre-made ballyhoo rig | Blue Water Candy Skirted Wire Ballyhoo Rig | $14.99 |
| Item | Product | Unit Price |
| Single strand wire #9 | 4 ft AFW | $2.27 |
| Size 8/0 Hook | Mustad 7766 | $0.58 |
| ½ oz Egg Sinker | Tackle Direct Egg Sinker | $0.25 |
| Bait spring | C&H Ballyhoo Bait Spring | $0.50 |
| Skirt | Bluewater Candy 1 oz Hair & Mylar Skirt | $11.49 |
| Total Cost | $15.09 |
In the comparison, I priced out the same components that are in the pre-made rig. Comparing the total costs, the Blue Water Candy skirted wire ballyhoo rig is a pretty good deal. The price is nearly the same as buying the pieces individually and building the rig yourself, without needing to do the work. If you’d like to do the work yourself, here’s how to do it.
Required Materials:
- 1 Whole dead ballyhoo
- 1 7 inch Trolling Skirt
- Wire Leader
- 1 bait spring
- 1 egg sinker
- 8/0 J Hook
- I used 8/0 Mustad 7766
Instructions:
- First you’ll need to prep the bait by removing the eyes and pushing out the fecal matter. You can push out the fecal matter by pressing your thumb along the bottom of the bait.
- Thread the wire leader through trolling skirt, then the bait spring, then the egg singer, and the hook eye.
- Loop the wire around the shaft of the hook twice
- Thread the wire leader back through the hook eye, egg sinker, and tie a haywire twist between the egg sinker and nose spring.
- Leave about a one inch section of the tag end of the wire leader out and orient it so it points opposite the direction of the hook point.
- Lift the gill plate of the ballyhoo and slide the hook point into the fish.
- Push the hook point in and around until the hook point comes out the belly.
- Push the eye of the hook up into the fish
- Push the tag end of the wire leader, also called the pin, up through the jaw
- Push the bait spring over the mouth of the fish and hook it onto the pin to stay put.
- Snap the fish’s bill off.
- Push the skirt down over the bait spring
There are some common variations to rigging a ballyhoo this way. You could rig with a mono leader instead of a wire leader if you’re not targeting toothy wahoo. You could also add a second hook to the tail end of the bait if you’re getting short strikes. You can also buy a frozen ballyhoo, completely rigged with a skirt and wire leader from a bait shop.
Back to Table of Contents
Rigging a Strip Bait
Anglers routinely use strip bait when trolling. Strip bait is a cut portion of a fish, usually something like a bonita or small tuna, that has the fish skin on one side. The skin helps hold the strip together, helps it look natural, and prevents it from deteriorating too quickly. A strip bait is cut from the belly of a bait fish. It works best when the bloodline is in the center of the cut.
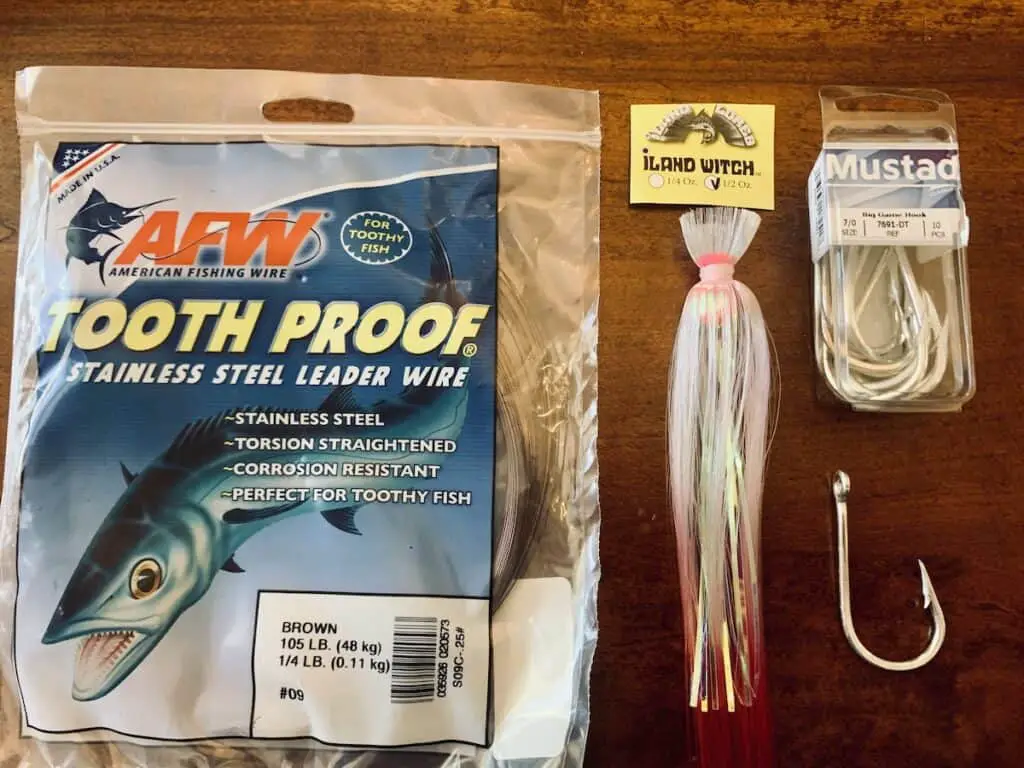
To rig a bait strip is very simple, You can use one hook or two. It’s common to use a wire leader and a trolling skirt, although sometimes heavy monofilament and no skirt are used. Below you’ll find the materials and instructions for how to rig a strip bait.
Required Materials:
- 1 7/0 J hook
- I used Mustad 7691
- 1 7/0 Open Eye O’Shaunessy Hook
- I used Mustad 34091
- Single strand wire leader size 9
- Trolling Skirt
- I used Iland Lures Trolling Witch
Instructions:
- Gang the hooks by threading the open eye hook onto the base of the other hook and crimp down the eye to secure it
- Thread the wire leader through the trolling skirt and then through the eye of the closed eye hook
- Tie a haywire twist above the hook eye
- Pierce the front end of the bait with the first, closed eye, hook
- Pierce the bait strip towards the middle, wherever the ganged hook lands. Make sure the bait lays flat when both hooks are in. A bend or bow in the bait strip will cause it to deteriorate faster and potentially slip off the hook
Trolling with a strip bait is easy to do and works well. The wire leader helps to protect against the bait getting bit off. A second hook towards the tail end helps to ensure you hook the fish when it strikes short.
Back to Table of Contents
Rigging A Sinking Lure
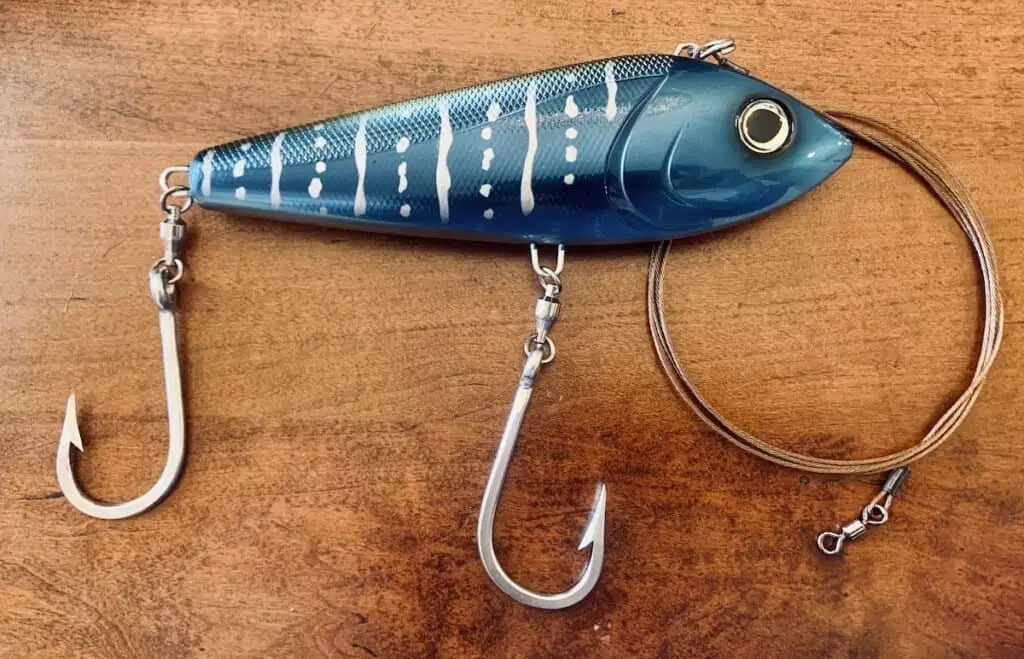
A sinking lure is a weighted hard bait that sinks to a certain depth when trolled. These lures do not have a lip or bib to help them dive, and so the depth is achieved strictly by weight. Big game species will strike these lures hard and nearly inhale the whole thing.
Sinking lures can be trolled at various speeds, some designed specifically for high speed trolling. The high trolling speeds can make these types of lures difficult to run true. I recommend buying a high quality one, such as the Nomad Madmacs (if you can find them in stock!) which has auto-tune technology to keep it running straight.
They can also be quite large in size, ranging from 6 inches to 10 inches. These lures usually swim tightly, nearly vibrate through the water. They provide a unique action that draws attention from some of the biggest trolling species.
If you’re interested in learning more about the fish species most commonly targeted with trolling techniques, read my article Trolling Species.
To rig a sinking bait for trolling, a wire leader is highly recommended. These lures are often used to target toothy wahoo and a wire leader will protect it from getting bit off. The rigging should also include a split ring to protect the lure eyelet from the wire, and a swivel to prevent line twist. Below, you’ll find the tools, materials, and steps required to rig a sinking lure for trolling big game.
The links provided will take you to the individual product pages at Tackle Direct.
Required Tools:
- Crimp tool
- I use Jinkai SC-3C
- Split ring pliers, if rigging with optional split ring
- I use the Nomad Design Split Ring Pliers Medium
Required Materials:
- 1 Sinking lure
- I used Yo-Zuri Bonita size 8 ¼ inch length
- Optional: 1 split ring
- I used Owner Hyperwire Split ring size #11, 250 lbs
- 1 barrel swivel
- I used SPRO Power Swivel size 1/0, 370 lb
- 2 Crimp Sleeves
- 2-4 feet Multi strand wire leader
Instructions:
- Starting with the lure, attach the split ring to the eyelet using the split ring pliers
- Slide the size 7F8 AFW crimp sleeve onto the 400 lb multi strand leader
- Thread the 400 lb multi strand leader through the split ring
- Bend the 400 lb multi strand leader back up and thread through the crimp sleeve. At this point, you will have two passes of the leader line through the crimp sleeve. If the appropriate size sleeve is used, it will be tight, with no possibility of the line twisting on top of itself inside the sleeve. Keep a very short tag end through the top of the crimp sleeve. If your wire cable is frayed, this part can be difficult. I had frayed wire and tried to cut it, and then it just frayed again. I tried wrapping a little plastic wrap tightly around the frayed edge, and then was able to thread the cable through the crimp.
- Hold the crimp sleeve and slide it down toward the split ring to decrease the size of the loop. A small loop is best, but it shouldn’t be so tight that it restricts any movement of the lure.
- Once the loop is an appropriate size, position the crimp tool on the crimp sleeve, right at the sleeve edges and crimp. With a metal leader, you can crimp right at the end of the crimp sleeve because there’s a negligible possibility of the crimp sleeve damaging the wire.
- Repeat step 6 on the other end of the crimp sleeve if the sleeve is long enough to accept two crimps.
- Cut the 400 lb multi strand leader about 2-4 ft away from the crimp.
- Slide the second size 7F8 AFW crimp sleeve onto the new end of the 400 lb multi strand leader.
- Thread the 400 lb multi strand leader through one end of the barrel swivel.
- Bend the 400 lb multi strand leader back up and thread through the crimp sleeve. Again, at this point, you will have two passes of the leader line through the crimp sleeve. Keep a very short tag end through the top of the crimp sleeve
- Hold the crimp sleeve and slide it down toward the swivel to decrease the size of the loop. A small loop is desirable.
- Once the loop is an appropriate size, position the crimp tool on the crimp sleeve, right at the sleeve edge and crimp.
- Repeat step 13 on the other end of the crimp sleeve if the sleeve is long enough to accept two crimps.
- Pull on the connections to ensure the crimps are tight.
- Make adjustments to crimps, if needed
At this point, your lure is pre-rigged. To connect the lure to your mono topshot, you’ll need to crimp the mono onto the swivel. This can also be done with a knot, but your mono topshot is likely to be 150 lb test, which makes a very bulky knot. You may want to also use a thimble at the barrel swivel on the mono side to prevent the swivel eye from wearing down the line.
You may want to consider rigging with a thinner wire if your lure is smaller than mine. I recommend always choosing a multi strand wire because of its usability. Multi strand wire is far more difficult to kink and will last much longer than single stranded wire.
Back to Table of Contents
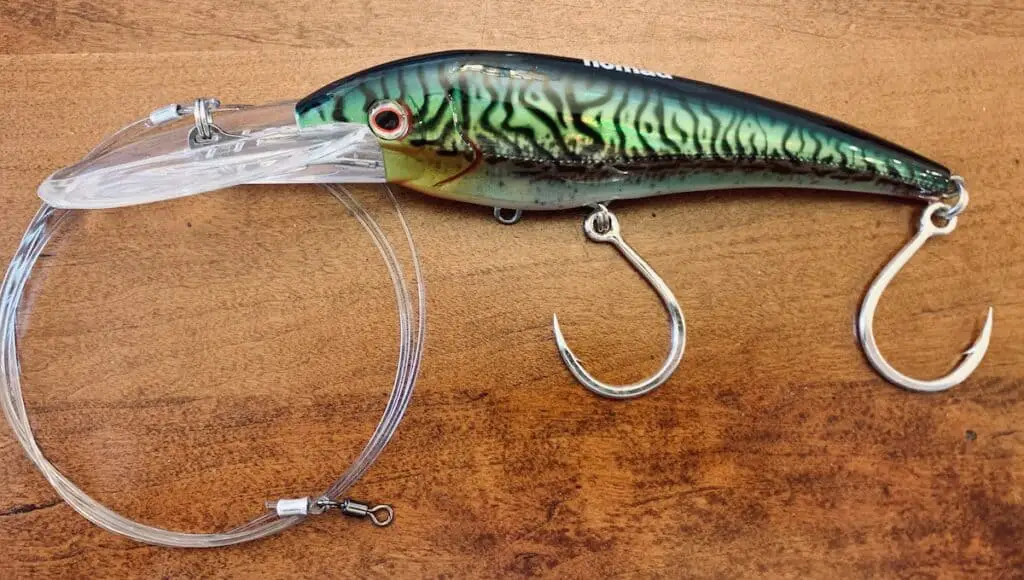
Rigging a Diving Crankbait
Hard baits with lips for diving action are becoming much more popular for trolling. Although they tend to be expensive, around $25 or more for each lure, they are meant to least a long time if properly cared for. In the long run, trolling with hard baits can be more cost effective than buying bait at a tackle shop, and more time efficient than catching live bait yourself.
Diving lures typically have a big lip, also called a bib, at the front of the lure. This lip causes the lure to dive when its trolled in the water behind the boat. The depth the lure achieves is determined by the size of the lip, the bigger the lip, the deeper the dive. However, the depth is also affected by the speed of the boat. As the boat speed increases, the lure dives deeper.
There is a learning curve when trolling with hard baits. It can be a challenge to keep them running true. I highly recommend always inspecting the lure before dropping it behind the boat and looking for things like bent eyelets or gashes in the side of the lure. These lures will take a beating from hard striking wahoo, and if the gash is too big, it can cause the lure to run off center.
Also look for any chips in the lip. If a chunk of the lip is missing, it will definitely affect how it runs. Keep pliers on hand to bend back eyelets and sandpaper to smooth out big gashes. I’d also recommend keeping a spare stock, in case the damage is too extensive to fix on the boat.
When it comes to rigging a lipped diving lure, you don’t need a wire leader even if you’re targeting toothy wahoo. The line eyelet is in the middle of the lip, so the strike will usually occur far away from the leader. The lip itself also protects against the lure getting bit off.
When trolling, your reel will usually be spooled with braid or mono main line. If it’s spooled with braid, you’ll need a mono topshot. If you need to learn more detail about the pros and cons of braid and mono for main line, read my article Mono vs Braid for Trolling. I also have an article that discusses Topshots and Leaders for Trolling. For now, we’ll hit the high points.
My reels are normally spooled with braid for trolling because I want to maximize my line capacity on a lightweight setup. When targeting wahoo, I use 80 lb braid main line with a 100 yard 150 lb monofilament topshot.
To put on a lure, I crimp the 150 lb mono topshot to a rigged Nomad DTX Minnow, or Rapala X-Rap Magnum. See below for the “recipe” on how I pre-rig the lures. The links will take you to the product pages on Tackle Direct’s website.
Required Tools:
- Crimp tool
- I use Jinkai SC-3C
Required Materials:
- 1 Diving Lure
- I used Nomad DTX Minnow sinking lure size 165mm
- Note: Nomad DTX Minnows come with a split ring already on the eyelet
- 200 mono leader line
- 2 Crimp sleeves for 200 lb mono leader line
- I used Jinkai crimp sleeves, size H
- 1 Barrel swivel
- I used SPRO Power swivel, size 2, 230 lb test
Instructions:
- Slide the size H Jinkai crimp sleeve onto the 200 lb mono leader line
- Thread the 200 lb mono leader line through the split ring
- Bend the 200 lb mono leader line back up and thread through the crimp sleeve. At this point, you will have two passes of the leader line through the crimp sleeve. If the appropriate size sleeve is used, it will be tight, with no possibility of the line twisting on top of itself inside the sleeve. Keep a very short tag end through the top of the crimp sleeve.
- Hold the crimp sleeve and slide it down toward the split ring to decrease the size of the loop. A small loop is desirable, although be sure not to make it so small that it inhibits the movement of the lure.
- Once the loop is an appropriate size, position the crimp tool on the crimp sleeve, a little bit away from the one of the sleeve edges and crimp. You should see a flared end on the crimp sleeve.
- Repeat step 6 on the other end of the crimp sleeve if the sleeve is long enough to accept two crimps. At this point, both ends of the crimp sleeve should be flared out. This is called a bowtie crimp and is done on purpose to prevent the metal sleeve from cutting into, and minimizing the strength, of the mono line.
- Cut the 200 lb mono leader line about 2-4 ft away from the crimp. Any length between 2 and 4 feet will work, but I recommend starting closer to 4 ft in case you need to cut it down and redo something.
- Slide the second size H Jinkai crimp sleeve onto the new end of the 200 lb mono leader line.
- Thread the 200 lb mono leader line through one end of the barrel swivel.
- Bend the 200 lb mono leader line back up and thread through the crimp sleeve. Again, at this point, you will have two passes of the leader line through the crimp sleeve. Keep a very short tag end through the top of the crimp sleeve
- Hold the crimp sleeve and slide it down toward the swivel to decrease the size of the loop. A small loop is desirable.
- Once the loop is an appropriate size, position the crimp tool on the crimp sleeve, a little bit away from the one of the sleeve edges and crimp. You should see a flared end on the crimp sleeve.
- Repeat step 13 on the other end of the crimp sleeve if the sleeve is long enough to accept two crimps. At this point, both ends of the crimp sleeve should be flared out, making the bowtie crimp.
- Pull on the connections to ensure the crimps are tight.
- Make adjustments to crimps, if needed
- Trim tag ends. The tag ends must be very short to eliminate the possibility of affecting how true the lure runs.
When it comes time to put the lure on your line, you’ll need to have crimp sleeves and a crimp tool on board the boat. You’ll slide a size I Jinkai crimp sleeve onto the 150 lb mono topshot, then thread through the ball bearing swivel and slide the tag end of the topshot back up through the crimp sleeve. Make a bowtie crimp and trim the tag end. This is a quick and reliable connection when done properly.
If you want to change the lure, simply cut the end of the topshot. You’ll need to cut the loop at the swivel and cut off the crimp sleeve. Then you can attach your desired lure, the same way you did before.
Back to Table of Contents
I hope this article keeps you prepared for your next trolling trip. Tight lines, y’all!
Recent Posts
Fat Cow Jig Strips: The Ultimate Bucktail Jig Upgrade for Surf Fishing
As discussed in my previous article, "Surf Fishing with Bucktail Jigs: Ultimate Guide for Beach Anglers," bucktail jigs are a staple in any surf angler's tackle box, offering a versatile way to catch...
In my previous article, "Surf Fishing with Bucktail Jigs: Ultimate Guide for Beach Anglers," I introduced you to the bucktail jig and discussed how versatile of a lure it is for catching a wide range...