
How to Do High Speed Vertical Jigging
Anglers often find themselves exhausted after doing high speed vertical jigging for a period of time. It requires a rapid retrieve while twitching the rod up and pausing it and then repeating that pattern. The jigs used are heavy and they need to spend most of their time in a retrieve to properly show it’s action. As they rapidly ascend, the jigs dart back and forth, acting like fleeing baitfish.
Possibly the most important piece of the technique is keeping a tight line as long as possible. The jig works best when actively quickly pulled up, and this simply cannot happen without a taut line. Pelagics find this darting action and the flashy paint jobs enticing. When you use this technique in an area where you can be sure pelagics are present, you’ll undoubtedly catch a fish.
Speed jigging is exciting for anglers. There’s a certain amount of adrenaline flowing when you’re rapidly pulling jigs up, and the fish will strike these jigs hard. If you think about it, the fast moving jig is imitating a healthy and fleeing baitfish that necessitates a hard strike from a predatory fish. This is opposite of slow pitch jigging, in which the jig imitates a dying baitfish and invokes a softer, convenience strike from fish.
What Fish Can You Catch Speed Jigging?
Pelagics are the primary target for high speed vertical jigging. These are tuna, kingfish, mackeral, among others. They are called pelagics because they swim around the middle of the water column. They can be at various depths and will often follow bait upwards and strike.
Although pelagics are most commonly targeted with speed jigging, bottom dwellers like flounder, grouper, and snapper are also targeted. Practically speaking, one can assume this is because bottom dwellers inhabit waters within 30 feet of the ocean floor. Pelagics can be anywhere above that. Jigs that are pulled upward through the water column spend more time in the water depth range that pelagics dwell in.
To find pelagics, always look near underwater structure such as wrecks, reefs, ledges and rocks. Predator fish know that these areas are where baitfish will congregate. Baitfish can hide in these structures and can frequently be found fleeing these areas.
Pelagics will often strike baitfish as they’re fleeing these underwater structures. Speed jigging around structure is mimicking this exact behavior. Speed jigging has been a successful method of catching pelagics from countless years because it successfully imitates a natural behavior.
Speed Jigging Rods
High speed vertical jigging is a relatively heavy tackle technique. The hard strike of a fish, heavy jigs, and high line strength generally requires a heavy power rod. When looking at rod models, you’ll notice that as lure rating goes up, the power rating of the rod goes up. You’ll be able to find the right power rod for you once you figure out the lure rating you’ll use most often.

You can estimate your most common jig size by considering the depth of water you’ll most frequently jig in. Using an estimate of 1 gram of jig weight per 1 foot of water, you can hone in on the lures you’ll usually use. The lure rating of the rod should include your most common jig sizes. Using the right size jig and rod combination is important in getting the best action out of your jigs, and therefore the best results.
The action of the rod is also important. A fast action is best because it’ll give the angler just enough flexibility to work the jig while also helping you get to the fighting power of the rod, the backbone, faster. You’ll need the backbone to pull in strong, pelagic fish. Slow action does not work well for speed jigging because it gives far too much movement which creates slack which is detrimental to speed jigging.
With speed jigging, spinning setups and conventional setups can both work well. With speed jigging, the retrieve is the most important part, and both spinning setups and conventional setups are capable of doing this well. The rod and reel combination is normally held for the duration of the technique, which eliminates any need to consider the underneath or overhead location of the reels and guides. For me, I opted for a spinning setup for speed jigging because it’s simple and anyone that comes on my boat will be able to use it while simply needing to figure out how to do the rod movements and retrieval at the same time.
A full grip butt end is common for speed jigging rods. A split grip will also work. Typically a split grip is chosen when someone wants to minimize the weight of the rod, and when a slow action needs to bend all the way to the rod butt. In speed jigging, weight is not as critical as it is in slow pitch because anglers simply cannot last that long doing the technique.
The length of the rod is typically somewhere between 5’9” and 7’2”, like most other methods of fishing from a boat. The rod only needs to be long enough to hang over the side of the boat and work a jig. If a rod were too long, it would become difficult to store in the rod holders on the boat. If you plan to use the rod for bottom fishing too, you may lean towards the shorter end of the range. If you plan to also sight cast with the rod, you may lean towards the longer end of the range.
It’s common for speed jigging rods to also be used for other techniques. The fast action and heavy power can work well for bottom fishing and casting as well. For speed jigging, it’s important to use the appropriate lure for the rating and line for the rating.
Speed Jigging Reels
High speed vertical jigging is one of the fishing techniques with more flexibility in the desirable reel features. Spinning or conventional will work well, and low or high gear ratios will work. Conventionals can be challenging if they’re too wide and require manual levelwinding at the same time as rapidly retrieving a jig.
The power needed to pull in a pelagic can be found in both spinning and conventional reels. Spinning has the advantage of being far easier to use, especially for novice anglers. There is essentially no risk of birds nesting your line and no need to worry about an even line lay in a spinning reel.
Gear ratio and retrieve rate go hand in hand. Lower gear ratios have more power, but slower retrieve rates. Higher gear ratios have less power, but faster retrieve rates. A low gear ratio is preferable when trying to pull a hard fighting grouper out of a reef, which makes a low gear ratio reel a great choice if you’ll also use the setup for bottom fishing.
A high gear ratio is preferable when looking to pull in a cast or pull in a fast pelagic. This makes a higher gear ratio reel preferable if you’ll also use the setup for casting offshore. As you can tell, it’s the other fishing technique that weighs heavier on the gear ratio decision.
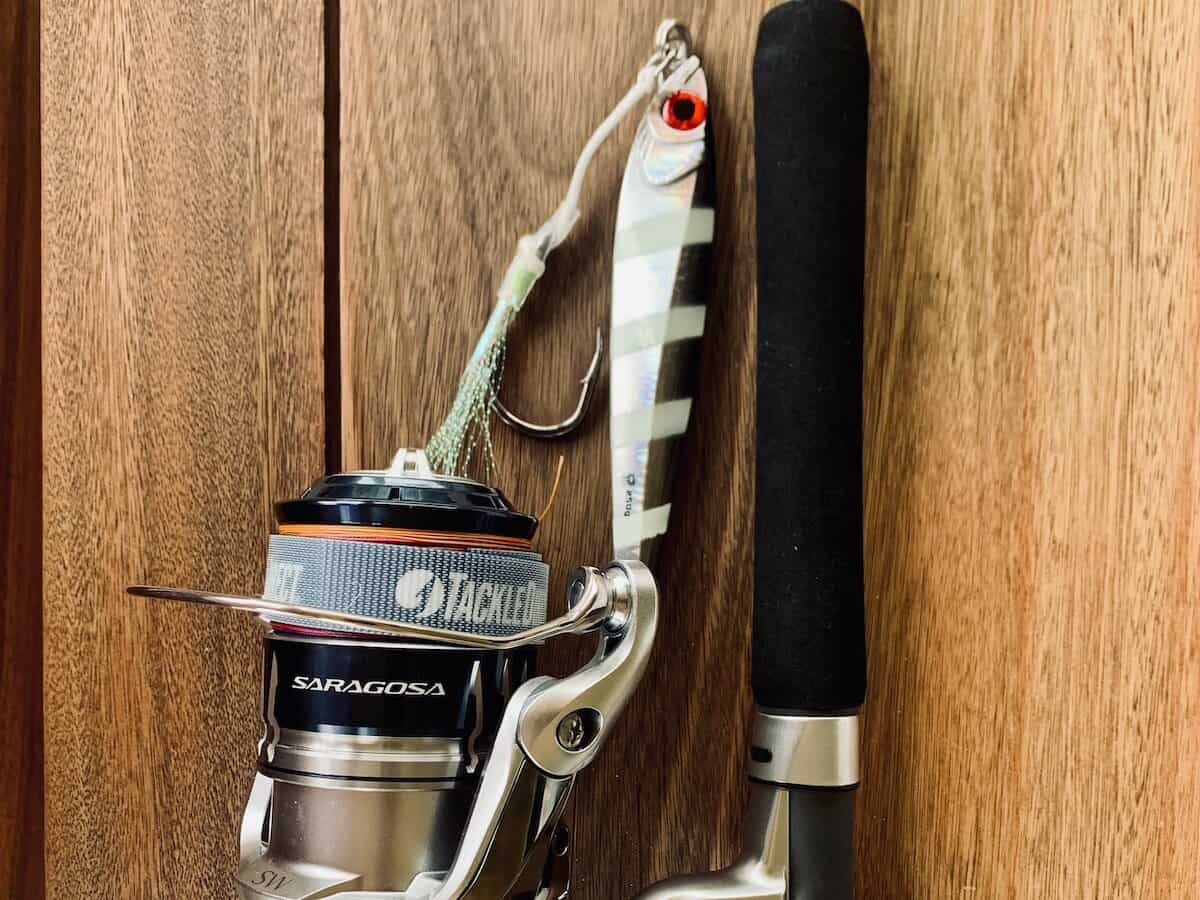
For my speed jigging setup, I use a Shimano Terez spinning rod with a Shimano Saragosa SW8000HG spinning reel. My vision when I bought the setup was to use it for sight casting to dolphin or cobia, and also use it for speed jigging.
Jigging Main Line
Main line for jigging should be thin diameter to help the line stay taut as the jig cuts through the water, and also must be strong to hold up against the weight and fight of a strong pelagic or bottom dweller. Its common for anglers to use at least 40 lb test line, but I’ve seen up to 80 or 100 lb test used.
Keep in mind that you should consider then line strength you want to use when identifying the rod and reel model to purchase. The strength of the line will impact the line capacity of the reel and you’ll need to make sure you have plenty of line to reach bottom plus some margin for line scoping and fish fighting.
High speed vertical jigging works best when the angler can tell when he or she reaches bottom, or gets a strike, or makes contact with underwater structure. To be able to feel these things, you must use a highly sensitive line. Braid has the sensitivity you’ll need for this.
The diameter of braided fishing line is also small compared to other types of line. This helps you maximize the line capacity of the reel and keep the jig moving through the water with tight line. To read more about the differences between braid and mono as a main line for jigging, read my article on it, here.
As for me, I normally do speed jigging in waters less than 200 feet deep. I spooled my Shimano Saragosa SW8000HG spinning reel with about 300 yards of 40 lb test braid. I also opted to use PowerPro Depth Hunter line which changes color every 25 feet. I count the length as I drop the jig to help me identify when I’ve hit bottom.
Leader Line for Speed Jigging
Braided main line has some drawbacks that drive the need for a leader. Braid has zero stretch which can cause it to break with a hard hookset. Using a 30 foot monofilament leader will give enough stretch to protect the main line braid from getting broken off.
Braid also is very poor at resisting damage from contact with structure. If no leader was used, the braid would quickly deteriorate in line strength by tearing apart at contact points. When you’ve got an expensive jig on the other end of the line, or your trophy fish, the last thing you want is to lose it because your fishing line deteriorated in strength.
Fluorocarbon can also be used in place of monofilament for a leader. The primary advantage of fluorocarbon is how invisible it is underwater. Using a fluorocarbon leader can help you land a leader-shy fish like snapper, especially when the waters are very clear.
The length of your leader line should be enough to protect it from structure. If you’re fishing a 20 foot tall reef, choose at least a 20 foot long leader. You’ll also want to use a higher strength line around heavy structure. The diameter of the fishing line increases as the strength of the line increases, so a 100 lb monofilament can be quite thick.
The braided main line and the monofilament leader are typically joined together with a low profile knot. The knot will go through the guides if the leader length is long enough and it must fit without getting hung up. An FG knot or an Alberto knot will suffice.
To learn even more about choosing a jigging leader, read my article Jigging Leaders: Why You Need One and How to Choose It.
Jigs for High Speed Vertical Jigging
Speed jigs have pretty distinctive designs. They are heavy metal lures with weight advertised in grams and hooks swinging instead of built in. They are characterized by a long and slender body with harsh contours. They often have flashy paint jobs too.
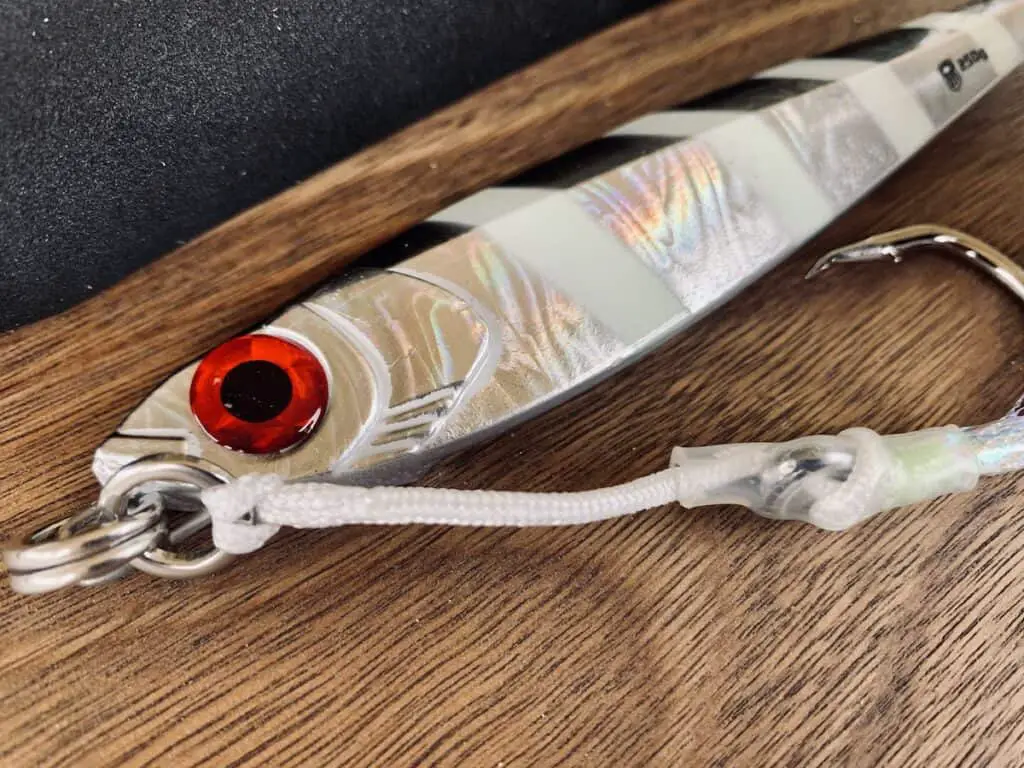
This design allows the jig to reach bottom quickly and dart in erratic ways during the retrieval back up. The paint job helps the jig reflect light when there’s seemingly very little light around.
Speed jigs work best on a taut line climbing up the water column. They look like fleeing baitfish, especially if they’re moving up and out of some underwater structure. My article, Speed Jigs, will teach you how to choose the right size hook, how to rig them, and how to work them.
Speed Jig Rigging
Most often, a speed jig will come pre-rigged with a single heavy gauge assist hook. This hook is commonly attached to a solid ring, and then a split ring that is attached to the jig’s top eyelet. All you need to do before use is tie your leader line straight to the solid ring with a clinch knot and you’re ready to go.
Sometimes you’ll need to replace hooks, or add hooks to an unrigged jig. I recommend buying a variety of single assist hooks, like the OTI Raptor Assist Glow Hook, and keeping them on hand when jigging. They offer hooks with and without the extra flash material, and you can frequently find different length cords. Split ring pliers, such as the Shimano Power Pliers, are a must have when rigging speed jigs.
Speed Jig Assist Hooks
The single assist hooks used in speed jigging are normally heavy gauge. The thick gauge gives the hooks the strength they need to be the sole penetration point for the fish. Once a fish strikes and is hooked, there is very little chance that the fish gets lost due to a bent hook.
Using the appropriate sized hook is also a key factor for speed jigging. I recommend using a hook that is slightly narrower than the width of the jig. I also recommend using a hook that has a long enough cord for the bottom of the hook to reach to about the middle of the jig. This decreases the chances of a short strike.
Although this is my recommendation, you can mitigate the risk of a short strike in another way. You could attach a second single hook to the bottom eyelet. To a lot of experienced anglers, they’d like to maximize the number of hooks in hopes of increasing their hookup ratios.
To attach a second hook to the bottom eyelet, you’ll need to use split ring pliers to attach a split ring to the eyelet. Then you can attach a hook to a solid ring and attach that solid ring to the split ring.
A word of caution about loading up your jig with hooks: be mindful of when your jig starts looking like it has too much on it. This can happen when using multiple hooks with flash material. Bulky additives on the jig can negatively impact the jig’s action and worsen your results.
Hopefully this article helps get you better prepared for your next trip doing high speed vertical jigging. Tight lines, y’all!
Recent Posts
Fat Cow Jig Strips: The Ultimate Bucktail Jig Upgrade for Surf Fishing
As discussed in my previous article, "Surf Fishing with Bucktail Jigs: Ultimate Guide for Beach Anglers," bucktail jigs are a staple in any surf angler's tackle box, offering a versatile way to catch...
In my previous article, "Surf Fishing with Bucktail Jigs: Ultimate Guide for Beach Anglers," I introduced you to the bucktail jig and discussed how versatile of a lure it is for catching a wide range...